Shortcuts
Bigshot is built to be reached from the keyboard. Every capture has a global shortcut, and the island answers to single letters while the pointer is on it.
Replace the macOS screenshot keys
| Shortcut | macOS | With Bigshot |
|---|---|---|
| ⇧⌘3 | Saves the screen to the Desktop | Captures the display |
| ⇧⌘4 | Saves an area to the Desktop | Selects an area to capture |
| ⌃⇧⌘4 | Copies an area to the clipboard | Selects an area to capture |
Every Bigshot capture is copied to the clipboard as well. ⇧⌘5 stays with macOS and still opens its Screenshot toolbar.
- In Bigshot, open Settings › Shortcuts and turn on Use ⇧⌘3 and ⇧⌘4 for Bigshot. (The Setup Guide's Screenshot keys step does this and the next step in one click.)
- Click Turn Off macOS Keys. Bigshot unticks ⇧⌘3, ⇧⌘4 and ⌃⇧⌘4 in macOS's own shortcuts. ⌃⇧⌘3 and ⇧⌘5 stay on.
- If macOS still takes the keys, click Open Keyboard Settings, choose Screenshots in the sidebar and untick them by hand.
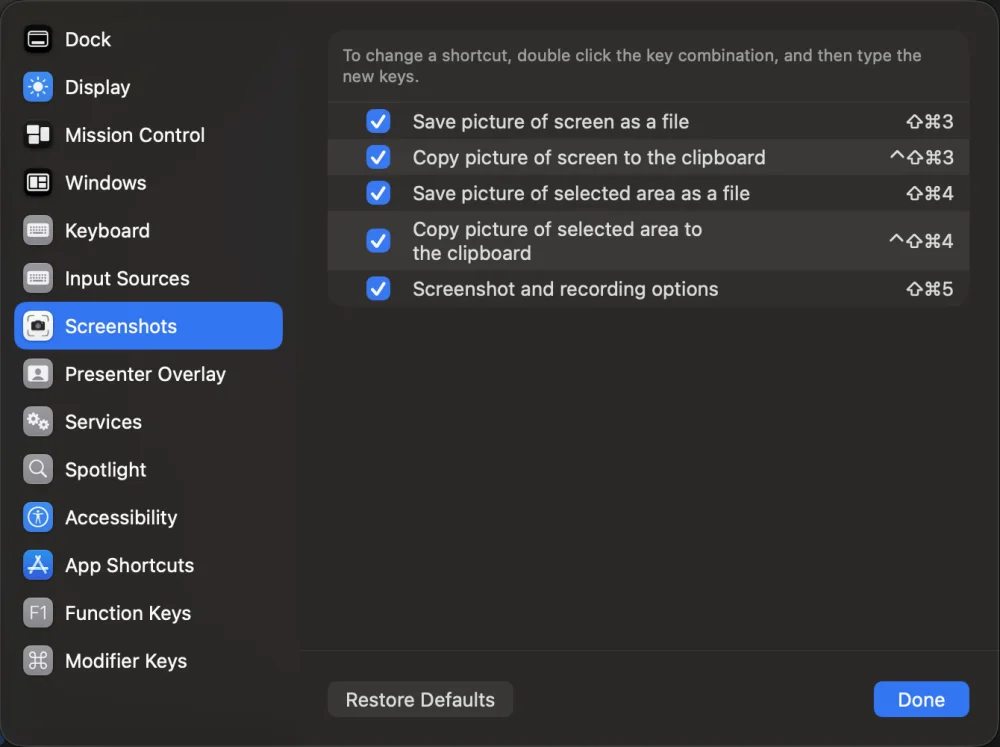
The warning in Settings goes away once macOS lets go of the keys. To give them back, tick them again in System Settings and turn the Bigshot setting off.
Turning the setting on also turns off the shortcuts these keys replace, ⌃⌥D and ⌃⌥A, so Bigshot holds one key per action. Settings › Shortcuts lists those two under their ⇧⌘ keys. Click Turn On next to one, or give it a new shortcut, to use it as well. Turning the setting off turns both back on.
Capture shortcuts
These work from any app. All defaults are ⌃⌥ (Control + Option) plus a letter.
| Shortcut | Action |
|---|---|
| ⌃⌥C | Capture with the selected mode |
| ⌃⌥D | Capture the display under the pointer |
| ⌃⌥W | Capture the frontmost window of another app |
| ⌃⌥A | Select an area to capture |
| ⌃⌥S | Smart capture (Licence) |
| ⌃⌥F | Open Capture Frame; with it open, start or stop its timer |
| ⌃⌥B | Select an area and run an agent on it with your instructions |
| ⌃⌥L | Code Lens: select an area and see which components render it (Licence) |
| ⌃⌥O | Open the Library |
| ⌃⌥I | Show or hide Bigshot: opens or closes Expanded View |
Without a Licence, ⌃⌥S opens Settings › Licence, since Smart capture is licensed.
While an Area or Smart selection is on screen, ⌃⌥D and ⌃⌥W close the selection without taking a shot.
⌃⌥ is also VoiceOver's modifier. If you use VoiceOver, rebind them.
Quick shortcuts
With the pointer on the island, in Peek View or Expanded View, single letters work with no modifier. Move the pointer away and they are typing again.
| Key | Action |
|---|---|
| P | Switch the Active Project |
| T | Switch the tag new captures carry, or create one |
| M | Switch the capture mode |
| C | Capture with the selected mode |
| A | Select an area and run an agent on it |
| L | Code Lens |
| O | Open the Library |
| H | Pause or resume Hooks |
P, T and M open the Quick Picker under the island. In it:
| Key | Action |
|---|---|
| ↑ / ↓ | Move through the list |
| Return | Take the selection |
| Esc | Close the picker |
Typing narrows the list. See The keys.
Changing a shortcut
In Settings › Shortcuts, click a key cap and press the new combination.
- Esc keeps the old binding.
- ⌫ restores the default. A reset arrow also appears beside any binding that differs from its default.
- A shortcut needs at least one of ⌃, ⌥ or ⌘. Shift alone is refused, since it would take the key away from typing in every app.
- Return, Tab, Delete, Esc, Enter and Forward Delete cannot be used.
- Two Bigshot actions cannot share a combination.
The menu-bar menu shows the current bindings. While it is open, ⌘, opens Settings and ⌘Q quits Bigshot.
Inside Bigshot
Area and Smart selection
| Key | Action |
|---|---|
| Esc | Cancel |
| ⌥ (held) | Smart: drag freely, no highlight or snapping |
| Scroll | Smart: step out to the enclosing region, or back in |
Capture Frame
| Key | Action |
|---|---|
| Return or Space | Start the timer |
| Esc | Stop a running countdown |
| ⌃⌥F | Start the timer, or stop a running countdown |
Run an agent
The panel that opens after selecting an area with ⌃⌥B, A on the island, or Agent in the island's stack.
| Key | Action |
|---|---|
| ⌘Return | Run the agent |
| Esc | Cancel |
Code Lens
The overlay that opens after selecting an area with ⌃⌥L, L on the island, or Lens in the island's stack. See Code Lens.
| Key | Action |
|---|---|
| Click a label | Open that file at the line in your editor |
| Esc | Close |
Capture Editor
The editor is built to be driven from the keyboard, the way a design tool is: one bare key per tool, a digit per colour, brackets for weight. The keys work whenever you are not typing into a text box or field. Pressing a shape, line or measure key also picks what the tool draws, so R is "draw a rectangle", not "open the shape menu".
| Key | Tool |
|---|---|
| O | Circle |
| R | Rectangle |
| H | Highlight |
| S | Spotlight |
| A | Arrow |
| L | Line |
| T | Text |
| N | Step (the numbered markers) |
| B | Redact |
| C | Crop |
| M | Measure a distance |
| ⇧M | Measure a size |
| I | Colour Picker |
| ⇧T | Select Text |
| Key | Colour and weight |
|---|---|
| 1 – 7 | Red, orange, yellow, green, blue, white, black, in the order of the swatches |
| [ / ] | Thinner / thicker. Weight also sets the text size and step size |
Colour and weight keys act on the selected annotation as well, as the toolbar's own controls do. Every tool's tooltip shows its key, and the Shape, Line and Measure menus list the keys beside their glyphs.
| Key | Action |
|---|---|
| ⌘Z / ⇧⌘Z | Undo / redo |
| ⌘S | Save over the file and close |
| ⇧⌘S | Export a copy |
| ⌘. | Cancel: close without saving |
| ⌘⌫ | Move the screenshot to the Trash |
| ⌫ | Delete the selected annotation |
| Esc | Deselect, or cancel a pending crop |
| Return | Apply a pending crop, or finish text |
| ⌘C | Colour Picker: copy the colour. Select Text: copy the text. |
| ⌘ (held) | Crop and Measure: turn edge snapping off |
| ⇧ (held) | Measure Distance: keep the ruler level or upright |
Library
S, T, P, K, E and ⌘C act on the screenshot under the pointer, or on the selection when the pointer is on it or off the screenshots.
| Key | Action |
|---|---|
| S | Select or deselect the screenshot under the pointer |
| T | Tag it: jump to the tag field |
| P | Move it to a Project: a menu at the pointer. Then 1–9 picks a Project, 0 the Session |
| K | Keep / Don't keep |
| E | Open it in the editor |
| ⌘C | Copy |
| Return | Open the selected capture in the editor |
| Esc | Deselect |
| Space | Quick Look the selection |
| Delete | Move the selection to the Trash |
| ⌘Z | Undo the last move, tag or Delete |
| ⌘A | Select all |
| ← → ↑ ↓ | Move the selection; with ⇧, extend it |
| ⌘+ / ⌘− | Bigger / smaller thumbnails |
| ⌘F | Search |
| ⌘-click / ⇧-click | Add to the selection / select a range |
| Click a day | Select that day; ⌘ or ⇧ adds it |
| Drag across screenshots | Select them; ⇧ adds, ⌘ flips |
In the tag field:
| Key | Action |
|---|---|
| ↑ / ↓ | Move through the suggestions |
| Return | Add the highlighted tag |
| ⌫ | With the field empty, remove the last tag |
| Esc | Clear the field and leave it |
See The Library.